I realize that most basement finishing projects probably don't begin with ripping out drywall and framework, but then again most basement projects don't deal with the previous owners of our house. So, yes, to begin the process of finishing our basement we have to start by ripping out drywall and some, if not all, of the framework that the previous owners did. This is because they did not pull any permits for the work so none of it is any good as far as the county is concerned. Quite honestly it wasn't good as far as we were concerned either since we couldn't use any of the outlets in one of the rooms without the cords overheating and destroying whatever we plugged in. Just what we want to happen with electricity right? (note: that was dripping in sarcasm).
Before we started the ripping out project Elizabeth talked to the county about what all we needed to do. We started out just by looking on the county website and that was intimidating as hell and started to freak us out. Luckily when she called the county and explained what was going on and our plans they gave her the name of one of the building officials who came out (free of charge!) to look at what we had going on. He said the previous owners were "f-ing idiots" and confirmed that yes, we needed to rip stuff out and proceeded to tell us how much the permit will cost (which is not as bad as we were thinking) and what all we needed to do to start. We might call on him again with some additional questions since he was so incredibly helpful to start.
So some things the idiots who owned the house before did :
- Have a SMALL closet right by the door, serving to close off the doorway which would have made it very hard to move any furniture into the bedroom.
- Left the light switches INSIDE the closet.
- Left the outlet boxes just hanging around in the basement.. not secured to ANYTHING at all. Just floating there in the middle of the wall.
- Did not add any additional insulation or fire blocking material that we can tell. This is a problem.
So things we have left to do:
- finish ripping out the drywall
- find out if we need to rip out the frame work
- get permit
- put in the frame work- all or just where the closet would go
- electric
- first inspection.
The order of the above list is not final and probably not in complete order, but it's a start, a very exciting start.
Friday, December 20, 2013
Saturday, November 16, 2013
Product Review: Cheesy Bacon Potato Soup

Mix 3/4 cup of soup mix with 2.5 cups of milk or water. Bring to a boil and cook for 10 minutes. Reduce to a simmer and cook for 10-15 minutes to let the vegetable chunks re-hydrate.
VERY simple! We've tried the soup mix with three different liquids so far: milk, chicken broth, and water. We found that the milk made the soup too thick and didn't hydrate the vegetables well at all. They were still tough and chewy. The milk made the soup more like a sauce you would put on something like broccoli- which I'm sure would be delicious. We've also used chicken broth to make the soup. I found this one to be really good. The thickness of the soup was perfect, it gave the soup extra flavor, and hydrated the vegetables perfectly. HOWEVER, if you want to do it this way I highly recommend trying to find some low-sodium chicken broth otherwise the soup is super salty. Water was also a good option, it didn't give the extra flavor the chicken broth did but it gave the soup the right thickness and the vegetables the right hydration without adding the salt.
I really enjoyed this soup and highly recommend it if you want freshly made soup but don't want to spend hours working on it!
Wednesday, November 13, 2013
Nico just doesn't understand.....
After around four months of Nico and Gypsy Kitty hostility, last night the hostility came to a head and Gypsy Kitty moved in with Elfie's parents. We had already been planning on moving her up there after having a discussion with said parents on Sunday- we just decided to move her up 12 hours a head of time. For the longest time I thought that the hostility was Nico thinking that Gypsy was food, now I'm not so sure. He's been pacing up and down the stairs all morning (since about 6:30 when we got up) and keeps staring, whining and barking and the two doors the cat was usually behind. It's really quite sad. On top of Nico acting up, Snickers is very confused and walked into the former kitty room and started whining. It's a sad day but Gypsy will be safer and happier up with Elfie's parents, and we knew this was eventually going to have to happen since Gypsy hates kids since some kids used to try to sit on her. On top of that our allergies towards Gypsy have been progressively getting worse and worse. Oh well. Gypsy is up with Elfie's parents, the dogs are with us and hopefully everyone in the house will settle down, and hopefully that means more blog posts will get written!
 |
| Nico doesn't understand that Gypsy now lives with Elfie's parents. |
Thursday, October 10, 2013
We're BAAAACCCKKK
Ok so, since we got Nico we've kind of slacked of on the blog, but trust us, Nico has been eating up SO MUCH of our time it makes sense. While we don't regret, even for a second, rescuing him, he is a handful and a half. So, an update about Nico and Snickers.
The two dogs are now getting a long the majority of the time, with only a few growlies here and there from Snickers when she is protecting something that she views as hers (mostly food). Nico has successfully destroyed one crate, about 1/4 of our bedroom carpet, a baby gate, the bottom of our bedroom door, a Washington Nationals Hoodie, a bathroom rug, and his face (multiple times). We finally figured out a way to keep him from Houdini-ing out of his crate and Hulk-destroying it. After he destroyed the first one- which was also the same night he destroyed the carpet and the bottom of the bedroom door, we got smart. We got a new crate, zip-tied ALL the edges together, and zip-tie the door shut when we leave so it has no give when he pushes against that. Once we did that, he focused on moving the crate, with him in it, and destroying the plastic tray within the crate...this is when he destroyed the Washington Nationals Hoodie that I loved so much. So next up we got a piece of plywood, cut it down to size so that it's about 2 inches bigger than the bottom of the crate, and used u-nails to nail the crate onto it. We also cut a piece of plywood to size to fit inside the crate, wrapped that with a stapled down blanket and replaced the plastic tray with that. Since we've done that he hasn't moved the crate or destroyed it any more than he did before we started that. Granted, we're not sure if we fixed it, or if it's just a matter of time before he figures out how to Houdini or Hulk-Smash his way out of the fortified crate.
Also, yesterday was Nico and Snicker's Good Manner's class graduation. We're happy to say that both dog's have improvement, but Nico still has a LONG WAY to go before he'll be ready to take the classes for his CGC (Canine-Good-Citizen) certification... the next step in getting him ready to be a therapy dog that kids can read to! Our biggest struggle with him, other than him either not knowing his name or having selective hearing, is his undeniable urge to chase Gypsy, the cat. She is NOT amused, ends up fluffy and has scratched his nose up more times than we can count. We're hoping we can fix it before he loses an eye. He's pretty good at sitting on command in the house, again not perfect, not doing it EVERY time, but getting there. He really is great at walking on a leash unless his sister, Snickers, starts getting him riled up.We just have to keep telling ourselves, he is better than he was when we first got him.
As far as the house goes, we really haven't done much. We finished our front flowerbeds, but haven't gotten around to ripping up the bushes and haven't done anymore painting or updating on the inside. We'll get there. So yes, after a couple months of unexpected hiatus, we're BAAACCCKKK.
Sunday, September 1, 2013
Product Review: Carrot Cake Cupcake Herbal Tea
It never fails, whenever I go downtown to get more tea from the PA Dutch Tea and Spice Company whichever tea I get becomes a favorite of mine. This week, it is the Carrot Cake Cupcake Herbal Tea. IT IS DELICIOUS! Right now I am drinking it warm, with some french vanilla creamer in it, but I am going to try it cold sometime this week as well since I suspect it will be just as yummy that way also. Even cold I will put the creamer in the tea since it adds an "icing" like flavor to the tea that makes it taste like I'm drinking an actual Carrot Cake Cupcake. Currently, you have to actually go to the store in downtown Fredericksburg, VA in order to get a bag of this delicious tea, but I'm sure they will have it up in their amazon store soon!
Wednesday, August 7, 2013
Meet our newest family member! Nico!

So today, I took off work and went to get our newest family member. Bully Paws took him to the vet, where I met them, so that he could get a clean bill of health. For the most part, our boy is a healthy guy. He needs lose 10-15 pounds. They also put him on medicine for intestinal worms and gave us an antibiotic for him for his skin since some of his skin is in rough shape. Some of his teeth are also worn down almost to his gums- which might be why he has shown very little interest in the Nylabone we got him (we might have to get one that isn't for such a tough chewer). So he came home with us! He's gotten a shower (it was easier than trying to get the big boy into the tub) and he was SO GOOD during it- even washing the sore areas of the skin he was fine, he just leaned against my legs. He LOVED being towel dried. In fact, even when I thought he was dry enough he kept coming back for another rub down.
Behavior wise it's going to take a couple days to really know since he is in a new home so is excited. Right now the biggest obstacle is that he has no obedience training- or if he once did he's completely forgotten it. He also doesn't know his name since Bully Paws named him. Right now we have to alternate having him leashed to the banister and in his crate because he keeps trying to jump all over the furniture and me. He also wants to chase the cat. However, while he clearly wants to get closer to Snickers, they are getting along fine within about a foot and a half of each other as long as Nico doesn't start jumping around. If he starts jumping around Snickers gets skittish. So yes, our work is cut out for us but it's really not that bad- he appears to be fully crate trained which is nice, especially since we're going to be working on crate training Snickers now that we've gotten her anxiety under control (the majority of the time).
Anyway, welcome home Nico!
Monday, August 5, 2013
Mailbox sign
For some reason that I can't really explain I have a very strong dislike for our mailbox, and while it is
 inexpensive to replace we just haven't gotten to it. However, I decided that I was going to take a step to make our mailbox look nicer-- so I made a new house number sign to hang underneath the mailbox. I did this partially because I wanted to, but also because the numbers aren't super obvious on the post when you're driving by. The next step is to paint the post and replace the mailbox, but that will come later.
So to make the sign I got the correct size wood plank from our local craft store- in this case I believe it was the 10 inch one. I also ordered new paint markers- which I am ridiculously excited about and have to resist the urge to go around the house and draw on every surface. So to make it I found some Basset Hound images online and traced them trying to find one that I liked. Once I did I traced it and colored on the other side of the tracing paper from the design. I flipped it back over and traced the outline of the basset directly onto the wood. This left a decent outline which I then outlined again with a pencil to make it darker. I repeated the process with the numbers. Finally, I used my paint markers to color in the basset. I repeated the process on the other side. After I left the design dry for a couple days I used an acrylic sealer from the store that is good on wood to seal it. It has yet to rain since we put it up though, so now we're just waiting for a good storm to see how it holds up :-) I really like the sign, although the dog doesn't reflect all the furbabies of the house anymore, it will stay just a basset.
So there we have it, one step closer to making our mailbox look nicer.
Monday, July 22, 2013
From the Hound's Kitchen: Pina Colada Oatmeal Bars
I absolutely LOVE pineapple and coconut so when we discovered Mrs. Miller's Homemade Pineapple Jam at PA Dutch Tea & Spice I knew I had to adjust one of my favorite recipes into a Pina Colada style bar. The original recipe is from The Pioneer Woman and is called "Strawberry Oatmeal Bars"(click on the name to get to the original recipe). AND THEY ARE DELICIOUS! Seriously, these things are addicting- they don't last more than 2 days in our house.
Anyway, after discovering the intriguing Pineapple Jam I set out to start adjusting the oatmeal bars recipe into a new recipe full of tropical goodness, and here it is :
Ingredients:
- 1-3/4 sticks cold butter, cut into pieces
- 1-1/2 cups all-purpose flour
- 1-1/2 cup Oats (quick or regular)
- 1 cup shredded coconut
- 1 cup packed brown sugar
- 1 tsp baking powder
-1/4 teaspoon salt
- 1 jar Mrs. Miller's Homemade Pineapple Jar
Directions
Preheat the oven to 350 degrees. Butter a 9 x 13 baking dish
Mix together the flour, oats, brown sugar, baking powder, salt and coconut. Cut in the butter with a pastry cutter until it resembles coarse crumbs*. Sprinkle half the mixture into the pan and pat lightly to pack it a little tight. Spoon preserves evenly over the surface, then use a dinner knife to carefully spread it around **. Sprinkle the other half of the oat mixture over the top and pat lightly again.
Bake until light golden brown on top, about 30-40 minutes. Remove from the oven and let cool in the pan.
When cool cut into squares and serve.
* Our pastry cutter broke a couple weeks ago and I have yet to replace it. So what I did was I used the biggest holes on my cheese grater and grated the butter. This worked well and if you are in a pinch I say go a head, but on a regular basis I would not recommend this as it was a pain in the butt of a process.
** Because of the consistency of the Pineapple Jam, it didn't really spread well so I used my fingers to press the jam around to spread it. If I tried spreading it, it would pull up the mixture underneath.
One of the things I think I will try next time is melting white chocolate chips and drizzling it over the top to make it more of a dessert bar. The bars are also delicious crumbled over ice cream.
The Pioneers Woman's recipe is also in the back of her new picture book Charlie Goes to School which is an adorable story about Charlie, her basset hound, starting a school for the animals on the ranch. I highly recommend the book as well.
Sunday, July 14, 2013
Organizing: Pots & Pans
Every now and then, Dork_Syd or I get the urge to organize, or re-arrange something. A couple weeks ago Dork_Syd got that urge about our living room/kitchen furniture and rearranged everything (with help from me once I got home from work). A week ago, about an hour before I had to leave for work I got a similar urge- only mine was to organize the pot cabinet. I really don't know why I had that undeniable urge, but I did. It might have been triggered by noticing a dent in one of the pot lids that came from pots falling over on top of it (but that is a guess). I remembered seeing a post on pinterest that suggested using command strips and hooks to hang the lids. Of course, I didn't pin that post apparently because now I can't find it. But there you go.
So anyway, an hour before I had to leave I got that urge and I went with it. I grabbed my tin of command strips and extra hooks and pulled everything out of the cabinet and proceeded to match up the size of the hooks with the lids. I ended up short so I have one pot lid that doesn't have a home on the door but that is ok. One is much better than the large number I had before.
Once I got the idea of the hook sizes needed for each lid, I attached the hooks to the door and tested the hang of the lids. I ended up having to move around a couple of the hooks- so it was a good thing I had extra strips because I needed a few of them! The first couple times I had the hooks too close together so the lids just toppled over. After a few mis-sticks I got the hang of it and finished up quickly! I put all the lids in their places, put the pots away and went off to work!
It was a quick and easy project that left that kitchen cabinet much neater! Now it's so much easier to find the lids that I need!
Sunday, July 7, 2013
Flower bed number two!
For most people the 4th of July is a day for fireworks and cookouts and generally being lazy. Not so for Dork_syd and me! We are very lucky to have friends who were willing to come over on a holiday and help with the process of boxing in our flower beds. About a month ago the same friends came over and helped up with boxing in the first of the front flower beds- see the post about that here - this time the focus was on the right side as you look at our house.
 This is a close up of the flower bed before ---->
we started working on it- even before we put mulched leaves down to help us visualize the size we wanted the flower bed to be. It's hard to tell from the picture but the side yard- and really the yard around the flower bed as a whole- slopes A LOT. Because of this the guys figured out the edge of this flower bed is going to have to be stair stepped because the top of the slope is higher than the front of the flower bed. When they discovered that it slowed work down a bit because now not only did they have to dig out the basic trench that the landscape timbers would go in- they had to figure out the placement of the timbers and it proved to be a much more in depth process than it was for the first flower bed.
So between the heat and the difficulty of this side- and the fact that both of the guys had to work the next day they decided to make this flower bed a two-part process. Once they decided on that path they focused on figuring out and laying out the main frame work- cutting a minimal number of timbers since the measurements are likely to change once they are fastened down. When we gather for the finishing of the flower bed the guys just have to pull out all the timbers (explode them!) and work on drilling the holes for the re-bar support and nail them all down, cutting the timbers as they go. I am very excited about the flower beds! Even not finished the front of the house is looking better and better!
After the flower beds are finished we will be working on pulling up the bushes since one of them is not there at all any more (it's asymmetrical -ARG!)and because the way they are growing I can't even trim them all to look the same without making the ones on the right bring to mind Charlie Brown's Christmas tree. We will then be looking into getting dirt/top soil to fill in the flower beds and the holes make from the roots. Planting will not happen until the spring most likely. We haven't 100% finalized what we're going to put in the flower beds but we're thinking of focusing on spreading plants, Dork_Syd would really like to put in some juniper bushes (which I'm good with) and I would like to put in some phlox. My parents have them and when they are in bloom they tend to grow over into their ditch and I think it would be really pretty to have them draping over the front of the flower beds. We'll see- we can always move the plants to a different location if we end up not liking them in those flower beds :-)
Friday, July 5, 2013
A place to rest your head
Due to the awesome generosity of my department head at work I now have a hammock in our backyard. Once we got the ant invasion MOSTLY taken care of (some reappeared in force this weekend) I was able to actually spend some time in said hammock. By some time I mean I spent all afternoon in the hammock a couple weeks ago reading. That got me thinking that I needed an outdoor friendly pillow that I could leave outside if I so desired without worrying overmuch about damage due to the crazy amount of rain we've been getting here in VA recently. I remembered seeing an idea on pinterest that used kitchen towels and up-cycled plastic bags to make an outdoor pillow. So I decided to do that! Only I put a different crafty spin on it.
I have a LOT of yarn to use. So I decided instead of using dish towels I would crochet the case. So that's what I did! I chained 52 using a J hook and cotton yarn, half-double crocheted in the 3rd chain from hook and across. Chained 2 and turned and kept going until I had the length I wanted.. or in this case ran out of yarn. I then made a matching back and crocheted three of the edges together with a single crochet.
I then pulled out the gigantic bin of plastic bags we had and dumped them out. I picked a bag that was closest to the size of the pillow case I made (in the future I will make the case to the size of a bag instead of having to find a bag the correct size). I then picked another back to go within the bigger bag- since the size of my case required a lot of bags- and started stuffing it with the plastic bags. I decided to fold the bags lengthwise so I could get more bags within the bag and therefore the case. When I filled it to the amount I wanted I folded over the top and stapled it in place. I put that stuffed bag within the other bag and made another stuffed bag. Once that was finished I stuffed it in the bag with the other one and stapled that shut. I placed the gigantic bag with the two stuffed bags into the case and crocheted the case shut. Check out the slide show below to see pictures of the process.
I haven't had an opportunity to use it since I completed it- its just been too hot- and then the ants invaded again. But I will! And if I leave it outside it won't be a big deal!
Saturday, June 29, 2013
From the Hound's Kitchen: Buffalo Chicken Wing Dip
IT'S SUMMER! You may have noticed unless a) you never leave your house or b) you live in the southern hemisphere. To us, summer means parties and cook outs. Parties often mean everyone brings their own dish and everyone gets a little of everything. This dish is Elfie and my go-to dish for parties. Buffalo Chicken Wing Dip. We got it from my parents to put into the family cook book. This is not a dip that your use to dunk chicken wings in; the dip itself is Buffalo wing flavored. IT'S AWESOME. We highly recommend trying it very soon.
Ingredients
2 8oz packages of Cream cheese, room temperature
3/4 cup pepper sauce, such as Franks Red Hot
1 cup ranch-style salad dressing
2 cups diced or shredded cooked chicken
1 cup shredded cheddar cheese
1) Preheat the oven to 350 degrees (unless using crockpot)
2) In a medium bowl, mix together the cream cheese and hot pepper sauce until well blended.
3) Mix in the ranch dressing, chicken and cheddar cheese
Only do the following if baking:
4) Spread into a 9 x 13 inch baking dish
5) Bake for 30 minutes, if oil collects on top, dab it off with a paper towel.
Serve with tortilla chips and/or celery
Notes: We usually cook ours in a crock pot. We recommend leaving yourself enough time to do it low and slow. It will work on high, but runs a greater risk of burning. We also usually make a double batch and freeze any leftovers. Finally, this dip goes great with the "Homemade" Tortilla Chips we've talked about.
One last thing. We've made it easier for you to share this blog with your friends. Click the buttons below to share this on the social media site of your choice. Thanks
Sunday, June 23, 2013
From the Hound's Kitchen: Spicy Dill Pickles

Spicy Dill pickles
Ingredients:
12 3-4 inch long pickling cucumbers (ok we used whatever cucumbers we had and just modified the brine amount as we went)
2 cups water
1 3/4 cups white vinegar
3/4 cup PA Dutch Dried Dill Weed
1/2 cup white sugar
8 cloves of garlic, minced
1 1/2 tbsp coarse salt
1 tbsp PA Dutch Pickling Spice
1 1/2 tsp PA Dutch Dill Seed
1/2 tsp red pepper flakes, or more if you like more spice
Ball Pickle Crisp Granules - follow directions for amount per jar
Directions:
1) Cut the ends off the cucumbers and cut them down to size if needed. If they are pickling cucumbers you can skip this part if you would like
2) In a large rubbermaid, combine the cucumbers, water, vinegar, dried dill weed, sugar, garlic, salt, pickling spice, dill seed, and red pepper flakes. Stir (or put the lid on tightly and shake), and let stand at room temperature for 2 hours, until salt and sugar dissolve.
3) Remove the cucumbers to 1 1/2 pint wide mouth jars (or whichever jars you have decided to use and cut the cucumbers to fit into). Ladle in the liquid from the bowl to cover the pickles, but don't fill all the way to the top. Add the correct amount of Ball Pickle Crisp Granules - in this case I put 1/8 tsp in each jar.
4) Use a damp paper towel to clean the rims of the jars, seal with canning lids. Bring water to boil in big pot (enough to cover the top of the jars with about 1 inch of water. Using canning tongs place jars into the water and boil for 20 minutes. Pull jars out, set on cloth towels on counter and allow to cool. Repeat with remaining jars.
We let the pickles sit for 10 days before we opened them to try them. They are definitely pickles. Ours have a strong vinegar bite to them, making Elfie pucker up every time! But that is ok.
Notes (aka things we learned to to next time/suggestions)
- This time we did not strain the herbs out of the brine before canning- next time we will since now we have to scrap off the excess dill weed and dill seed to get to the pickles.
- The pickling crisp is wonderful! Our pickles are nice and crispy!
- Try boiling the brine & letting it cool before adding the cucumbers to sit for the 2 hours. This should help get the flavoring out of the various dill herbs so that the pickles are nice and dill-y even when we strain out the herbs.
- Next time we will add more pepper flakes- this batch of pickles was not nearly as spicy as we would like- they are very vinegary though!
Wednesday, June 19, 2013
From the Hound's Kitchen: Lazy "Shepherd's Pie"
Hey Everyone! Dork_Syd here again. After the house upheaval Sunday, I was thoroughly spent. Not to mention that Mondays are the final days in my school week and I have papers due. That adds up to not wanting to cook. So until they come up with that gizmo from Back to the Future II, we have to settle to just use really easy recipes. I came up with this recipe awhile back on a day where Shepherd's Pie sounded awesome but I was too lazy to put in that much work. Thus, Lazy Shepherds Pie was created. Now, those well versed in Irish cuisine may want to stop reading now. The impending spike in blood pressure may kill you.
By definition, Shepherds pie uses mutton (lamb). Strike 1: we're using ground beef. This is technically Cottage Pie. However, there are few who know what Cottage Pie is. Also we're going to use instant mashed potatoes instead of peeled and boiled potatoes. Strike 2: Finally, rather than baking this for an hour or so, we're cooking everything simultaneously to cut down on time and mixing it as it's served. Strike 3: I'd imagine if we pulled this in Eire we would be "potatoed "to death. It's like stoning but with potatoes. Anyway, hope you enjoy this easy recipe as much as we do.
Lazy "Shepard's Pie"
1 lb ground turkey (or beef or chicken- whatever you have)
2 - 12 oz bags of frozen mixed veggies
3 cups water
 1 pkg beef stew mix
3 cups mashed potatoes (we use instant)
1) Cook the ground meat until cooked through. If you need to drain the meat, drain it once cooked. (feel free to leave a little of the excess liquid for extra flavor)
 2) Add the two bags of frozen mixed veggies and a cup of water. Cover and cook until vegetables are heated through, stirring occasionally.
3) Mix the beef stew mix in the remaining 2 cups of water. Add to the meat and vegetable mixture. Bring to a boil and leave uncovered to cook down the liquid.
4) Serve over mashed potatoes.
 If you are feeling adventurous, you can make your own gravy! Replace the water with stock (beef, vegetable, chicken, etc) While the vegetables are cooking add about three tbsp of flour and stir constantly. The flour will thicken the stock. Add the meat and vegetable mixture and continue to cook uncovered until desired thickness is reached.
By definition, Shepherds pie uses mutton (lamb). Strike 1: we're using ground beef. This is technically Cottage Pie. However, there are few who know what Cottage Pie is. Also we're going to use instant mashed potatoes instead of peeled and boiled potatoes. Strike 2: Finally, rather than baking this for an hour or so, we're cooking everything simultaneously to cut down on time and mixing it as it's served. Strike 3: I'd imagine if we pulled this in Eire we would be "potatoed "to death. It's like stoning but with potatoes. Anyway, hope you enjoy this easy recipe as much as we do.
Lazy "Shepard's Pie"
1 lb ground turkey (or beef or chicken- whatever you have)
2 - 12 oz bags of frozen mixed veggies
3 cups water
 1 pkg beef stew mix
3 cups mashed potatoes (we use instant)
1) Cook the ground meat until cooked through. If you need to drain the meat, drain it once cooked. (feel free to leave a little of the excess liquid for extra flavor)
 2) Add the two bags of frozen mixed veggies and a cup of water. Cover and cook until vegetables are heated through, stirring occasionally.
3) Mix the beef stew mix in the remaining 2 cups of water. Add to the meat and vegetable mixture. Bring to a boil and leave uncovered to cook down the liquid.
4) Serve over mashed potatoes.

Sunday, June 16, 2013
Order from Chaos
Well, I asked Dork_Syd to be the awesome hubby that I know he is when I was working and start cleaning. I really did just mean picking stuff up, and then he went above and beyond. He folded laundry and started thinking about how he wanted to mount our TV on the wall, but where it was just wasn't where he wanted to mount it. THEN he got to thinking about where he wanted to put it and how if we moved the china cabinets into the living room, and moved what wall the piano is on, and the sofa, and the chair how it would open up the doorway into the room. This makes us happy AND makes our slightly claustrophobic dog happy as well.
So when I came home, the house looked chaotic...
So I jumped right in to help! One of the things we both agreed on was the desire to center the piano so we used some painters' tape to mark center on the wall, and center on the piano ...
Clearly, this is still a work in progress. Around 10:00 PM we called it quits. Later this week I will be scrubbing our kitchen floors again (its been almost a year since I gave them a good scrubbing). After they dry we will bring up our dining room table and chairs so we can put them in the newly opened up kitchen. Doing that means that we can actually be adults and eat at a table instead of in front of the TV- which is more important when we have friends over.
Once we finish rearranging we'll post the final pictures :-)
Friday, June 14, 2013
From the Water Bowl: Pina Colada Pineapple Iced Herbal Tea
Elfie here! One of the drinks I have developed an addiction to is tea. ANY type of tea! I'm always willing to try it and during the summer, the fruitier, the better! Over the weekend Dork_Syd and I made orange jello with canned pineapple chunks in it, but when we drained the pineapple I saved the juice. Ever since we decided to get our budget under control we try to save money by minimizing waste this worked out well for me because I to LOVE pineapple juice. However, I can't drink it straight anymore, it's just too hard on my teeth. Since people mix tea with lemonade or lemon juice all the time, I thought why not try it with pineapple juice? So when we headed to PA Dutch Tea & Spice over the weekend I looked for tea that I thought would combine well with pineapple juice. I picked out the PA Dutch Pina Colada Fruit and Herbal Tea.
When I make tea in large batches, which is what I do when making iced tea, I use our coffee pot. We bought the coffee pot during a period when we were trying to get into drinking coffee and it didn't last long. I have found that it is PERFECT for brewing large amounts of tea without me having to keep my eye on a timer to ensure that the tea doesn't steep too long and get bitter. Usually I make 2 full 12 cup pots of tea when making a jug of iced tea. However, this time I was basing the amount off of the leftover pineapple juice so I only made 6 cups of tea since I had just under 2 cups of pineapple juice. I use 1 tsp of tea per cup. When making a full batch of tea I reuse the tea leaves for the 2nd pot since loose leaf tea can be used multiple times before it loses flavor. This time I also tried something new to sweeten the tea, I put 3/4 cup of store brand sweetener directly into the coffee pot so it mixed together as the tea was brewing. Depending on how sweet you like your tea you might was to use more or less of the sweetener of your choice. The end result is DELICIOUS and I highly recommend it!

Pina Colada Pineapple Iced Herbal Tea
6 cups water
approximately 2 cups of pineapple juice
3/4 cup sweetener
6 tsp of PA Dutch Pina Colada Fruit and Herbal Tea.
1) Put the 6 cups of water into Coffee maker
2) Place the PA Dutch Pina Colada Fruit and Herbal Tea in the coffee pot inside a coffee filter
3) Add the sugar to the EMPTY coffee pot, place pot in coffee maker, brew tea.
 4) Mix the brewed tea and pineapple juice in a jug.
5) Serve over ice, enjoy! (The tea ends up purple)
When I make tea in large batches, which is what I do when making iced tea, I use our coffee pot. We bought the coffee pot during a period when we were trying to get into drinking coffee and it didn't last long. I have found that it is PERFECT for brewing large amounts of tea without me having to keep my eye on a timer to ensure that the tea doesn't steep too long and get bitter. Usually I make 2 full 12 cup pots of tea when making a jug of iced tea. However, this time I was basing the amount off of the leftover pineapple juice so I only made 6 cups of tea since I had just under 2 cups of pineapple juice. I use 1 tsp of tea per cup. When making a full batch of tea I reuse the tea leaves for the 2nd pot since loose leaf tea can be used multiple times before it loses flavor. This time I also tried something new to sweeten the tea, I put 3/4 cup of store brand sweetener directly into the coffee pot so it mixed together as the tea was brewing. Depending on how sweet you like your tea you might was to use more or less of the sweetener of your choice. The end result is DELICIOUS and I highly recommend it!

Pina Colada Pineapple Iced Herbal Tea
6 cups water
approximately 2 cups of pineapple juice
3/4 cup sweetener
6 tsp of PA Dutch Pina Colada Fruit and Herbal Tea.
1) Put the 6 cups of water into Coffee maker
2) Place the PA Dutch Pina Colada Fruit and Herbal Tea in the coffee pot inside a coffee filter
3) Add the sugar to the EMPTY coffee pot, place pot in coffee maker, brew tea.

5) Serve over ice, enjoy! (The tea ends up purple)
Tuesday, June 11, 2013
From the Water Bowl: Lavender lemonade
Elfie here! One of the trends I've noticed over the past couple summers is flavored lemonades. However, I'm not talking cherry lemonade, or strawberry lemonade; I'm talking LAVENDER lemonade. I'll admit, when I first heard this, I crinkled my nose and thought it sounded... not so yummy. But recently I decided that I shouldn't knock it before I tried it. So I started looking around at recipes trying to get an idea of what would work best. I found a couple I liked and I made them, but they weren't QUITE right for me, so I modified them until they were. So I hope you find Lavender Lemonade as enjoyable as I do!
Lavender Lemonade

7 cups water
3 tbsp PA Dutch Dried Lavender Ultra
7 cups COLD water
3 cups lemon juice
2 1/4 cup sugar (if you want your lemonade to be sweeter- increase the sugar amount)
 1) Bring the 7 cups of water and sugar to a boil. Remove from the heat and add the lavender. Cover and steep for 1 hour. If you want a stronger lavender taste, steep longer. Strain the lavender flowers out. I did
this by using my spaghetti strainer over top of one of my pitchers.
2) Add the 7 cups of COLD water and 3 cups of lemon juice to the pitcher. Stir. Chill and Enjoy!
 As a side note, my lavender water was green before I added the lemon juice. After I added the lemon juice it turned a pinkish yellow color - but when it is in the glass it just looks like regular lemonade. I have no idea why it does this- but it made me happy and I giggled.
Anyway, I hope you enjoy this recipe as much as I do!
Lavender Lemonade

7 cups water
3 tbsp PA Dutch Dried Lavender Ultra
7 cups COLD water
3 cups lemon juice
2 1/4 cup sugar (if you want your lemonade to be sweeter- increase the sugar amount)
 1) Bring the 7 cups of water and sugar to a boil. Remove from the heat and add the lavender. Cover and steep for 1 hour. If you want a stronger lavender taste, steep longer. Strain the lavender flowers out. I did
 this by using my spaghetti strainer over top of one of my pitchers.
2) Add the 7 cups of COLD water and 3 cups of lemon juice to the pitcher. Stir. Chill and Enjoy!

Anyway, I hope you enjoy this recipe as much as I do!
Sunday, June 9, 2013
From the Hound's Kitchen: "Homemade" Tortilla Chips
Hey everyone, Dork_Syd again. It seems that I will be the one writing when food is involved.
Elfie and I LOOOOVE chips and salsa. So much so that we will often eat enough of them to constitute a full meal. This poses a couple of problems. One of them is nutrition. Store bought chips are fried in oil and covered in way to much salt, not to mention the processed ingredients. For the most part I don't really care about processed ingredients but we have found in many cases we can find cheaper and healthier alternatives if we take the time to look. By making our own chips, we can control what goes into them and how much , and what kind of, salt is used thereby getting better nutrition. The other issue with store bought chips is price. The average 10 oz bag of tortilla chips is about $3 and lasts the 2 of us maybe 4 sittings. We were fortunate to have one of our friends post a "recipe" to make your own tortilla chips. All you need is soft corn tortillas like these and some sea or kosher salt. The tortillas in link made enough chips to nearly fill a 40 cup, 16.5 in x 11.5 in x 5.5 food storage container like this. This poses more than a 50% cost savings over store bought chips.
Please know that this will be the most complicated recipe you will EVER see.
1. Acquire ingredients
2. Preheat oven to 350 degrees
3. Take a 2-3 inch stack of tortillas and place them on a cutting board.
4. Cut into sixths
5. Place cut pieces on UNGREASED cookie sheet
6. Sprinkle with sea or kosher salt until desired cover is reached*
7. Bake until crispy. I recommend starting at 10 minutes and increasing by 2-3 minutes until desired crispiness is reached.
8. Place on cooling rack
9. Store in airtight food storage container
*Also works with other spices. We recommend a cinnamon sugar mix, fiesta citrus spice blend, and any of the flavored popcorn salts.
These chips work well with any type of salsa. However, one of our favorites is Jake and Amos' Corn Salsa from Pa Dutch Food and Candy Company. Not very spicy but definitely full of flavor. The PA Dutch Food and Candy Company has a wide variety of salsas most of which we have tasted and highly recommend.
Unfortunately, We did not take any pictures with this process so please enjoy this gratuitous picture of our basset.

Saturday, June 8, 2013
From the Hound's Kitchen: Easy Chicken and Rice Burritos
Hey everyone, Dork_Syd here again. The boss said she wanted burritos for dinner tonight. I could think of no reason to argue. I was, however, able to come up with 2 good reasons not to argue. 1. Despite not being pregnant, it is still a bad idea to get in Elfie's way when it comes to food. 2. That sounded like a good idea. I, once again ignoring doctors' orders, got to thinking. We still had plenty of taco season left over from PA Dutch Tea and Spice Company and we came up with the idea for Easy Chicken and Rice Burritos. The taco seasoning's product page says to add 1 teaspoon to 8 oz of tomato sauce.We used this method for our burritos. On a side note, the 8 oz bag costs $9.15. This may seem like a lot until you consider the quality of the product and the fact that the average packet from a grocery store costs $1+ and is only about 1/2 oz.
Anyway, that's enough math for one post. In our efforts to save money, Elfie and I have done everything we can to plan meals around items we have in the house and/or to plan the week's meals before shopping so we only purchase what we absolutely need. We had all but three ingredients in the house already, so this was pretty easy to plan. FYI: these taste awesome and are super filling.
Without further ado, here is our recipe for Easy Chicken and Rice Burritos

3 cups cooked rice
1 Chicken Breast, boiled and shredded*
2 green bell peppers, chopped
1 heaping tablespoon of PA Dutch Taco Seasoning
1/2 large onion, chopped
Burrito tortillas
1 28 oz can of tomato sauce
1 tbsp butter
1 15 oz can of black beans (optional)
*One of the ways we have cut down costs is by eating less meat. You may want to use two or three breasts instead. Also, the recipe also would work with cubed or diced breast.
1) To cook the chicken, place in a saucepan and cover in water, heat on high. Cook for approximately 20 minutes. When chicken breast is fully cooked, use two forks to shred.
2) While the chicken is cooking, heat the butter in a large frying pan. Once melted, add the chopped bell peppers and onions. Cook for 5 minutes.
3) Add tomato sauce, Taco Seasoning, chicken and rice to the pepper and onion mixture. Add the beans to the mixture as well if you desire. Bring to a simmer, let mixture simmer for 10 minutes to cook off excess liquid.

4) Serve on tortillas & enjoy.


Sunday, June 2, 2013
From the Hound's Kitchen: Southwestern Mac & Cheese
Whether through intent or serendipity, our blog's name adequately describes what we cover. Home: We're new home owners and will use this blog to chronicle our adventures in home ownership: repairs, remodels, and upgrades. Sweet: We love to cook. That's how Dork_Syd wooed Elfie. She did homework while he cooked the world's best* spaghetti as their first date. The rest, as they say, is history. Hound: We love our Basset Hound, usually. We don't have children yet so we dote on our 4-legged children.
*not verified by unbiased parties.
Dork_Syd grew up with a lot of GOOD Italian cooking and is a firm believer in choosing the right spices can really make a dish pop. He and Elfie were fortunate enough to stumble into PA Dutch Tea and Spice Company and PA Dutch Food and Candy Company. These have to be two of the best food related store that we have been in. The tea and spice store has hundreds of teas and spices as well as things like tea infusers, tea pots, honey, and cookies (biscuits if you prefer the authentic British tea experience.) You will be very hard pressed to find many of the items featured in either store in your average grocery store(not to mention the best taco seasoning, ever, in my opinion). The Food and Candy store really brings credence to the old adage "kid in the candy store" reaction. They have chocolate, gummies, European and Asian candies, and nostalgic candies like wax bottles. Sounds amazing, but that is only half of the store. The other half has so much that it will be difficult to cover it all, but here I go anyway. They have cake and bread mixes (some of them gluten free), pickles (many types), salsas, sauces, dried fruit and vegetables, pasta, snacks like flavored chips and pretzels, and sodas. I may have missed some things. To see their entire product line up, check out their Amazon Store. There is also a link to their page in the upper left corner of this page. Anyway they're some great people with great products and a great small business.
Despite being ordered by doctors not to do so, Dork_Syd was thinking today... he and Elfie just got some taco seasoning and wanted to see what could be done with it besides tacos. Here is what Dork_Syd came up with.
Southwestern Mac & Cheese Bake


2 cups Uncooked elbow macaroni
4 tsp PA Dutch Taco seasoning (secret ingredient: Do not use store brand)
3 tablespoons butter
2 tablespoons flour
1 1/2 cups milk
16 ounces Mexican blend cheese, shredded
2 Green bell peppers
2 cups diced tomatoes (we used quartered cherry tomatoes)
3/4 cup chopped onion (about a quarter of a large onion)
3/4 cup chopped onion (about a quarter of a large onion)
1) Preheat Oven to 375 degrees.
2) Cook the Macaroni. Drain and set aside.
3) While pasta is cooking, melt 1 tbsp of butter and sweat onions and green bell peppers until fragrant. Add tomatoes cook for another 4 minutes. Drain excess liquid add to bowl with noodles. Avoid over cooking veggies otherwise they will turn to mush once baked.

4) In 4 cup glass measuring cup melt remaining 2 tbsp of butter on HI for 45 seconds. Stir in flour. Set aside.
5) Pour milk in 2 cup glass measuring cup and cook on HI for 1 minute or until warm.
6) Gradually stir milk into flour mixture. Cook on HI 3 minutes, stirring once during cooking. Stir, cook on HI 1 minute, or until smooth and thickening.
7) Blend in cheese and taco seasoning. Stir until melted.
8) In the bowl combine sauce, veggies and noodles. Stir. Once coated transfer to 9 x 13 casserole dish.
9) Bake at 375 for 25 minutes, or until bubbling
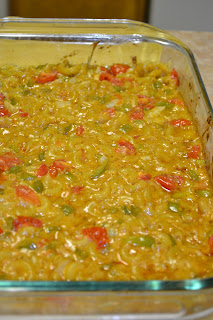
10)Serve and enjoy!

Monday, May 27, 2013
Flower bed #1- boxing complete!
This past Saturday the Hubby and I had friends over and the men were able to box in the first of the flower beds in the front!!!!
Before the front of the house/flower bed looked like this...


Before the front of the house/flower bed looked like this...


Now, after 4-5 hours of hard work and approximately 20 landscape timbers the front looks like this:


Already the front looks so much cleaner, and that is only one side! We're hoping in the next couple weekends we'll be able to get the other side boxed in as well. We already have all the timbers, re-bar and nails. Once we do that we'll be checking with the HOA to find out of the paint takes care of the rule that we have to have the bricks in the front covered. If so, we're going to go ahead and take out the box-woods, since they aren't even- and we just dislike how they look. After that we'll be looking into buying a truckload full of topsoil to fill up the boxes before we plant anything else. We're still debating what plants we'll get- that also largely depends on what the HOA says. No matter what the box-woods will be coming up at some point.
We also hung up the hammock that my boss was kind enough to give me since she no longer uses it.

Unfortunately, it's sprinkling so I wasn't able to used it right away. However, I was able to lay on it briefly. which gave me a lovely view of our trees covered in cicadas. This has been a good weekend!
Saturday, May 18, 2013
Kids make me smile
I've always had a dream, that depending on how close someone is to me, may or may not be secret. That dream is to publish AT LEAST one children's picture book. Luckily, due to my job as a children's librarian, and the friends I've made throughout the years, I have many testers for my stories. I recently wrote one that I have titled Norma the Bookworm that I sent to a friend from graduate school to share with her kindergarten classes. About a week after I sent the story to her, she messaged me on facebook letting me know her student's liked the story, but they thought it needed illustrations, so they drew me some. She then was awesome enough to mail them to me. They arrived yesterday (Friday) which actually was perfect because I desperately needed the smile they gave me since my Grandmother died earlier that morning (which is a blessing, but still sad). SO! I went through them and pulled out my favorite ones to share with you at the same time I share my story with you! I am sorry I can't share them all with you, there is just no way I can without taking up too much space. Also, I am very excited and nervous that I have sent a manuscript (not of this story though) into a publisher for consideration. I'm starting out small because even sending it to one publisher is a big step for me.


So I hope you enjoy Norma the Bookworm, written by me and illustrated by my friend's students.
Norma the Bookworm
Hi! My name is Norma, and I'm a bookworm. I live inside the books at the library. What are you making that face for? Living inside books at the library is awesome! I get to go on as many adventures as I want to.

How you ask? It's easy! I just pick up a book and dive right in.
Look! I'm a pirate, sailing the seven seas. What? You say I have no arms so I can't be a pirate? NONSENSE! With books there are no limits.

I can be an astronaut and fly to the moon! You know that it's a giant ball of paper right? Those craters are actually bites from all the bookworms that have flown there already. I bet you didn't know that.
I can be an archaeologist, traveling around the world digging up artifacts that tell the stories of our past. Look! There's a mummy!
I can be a dancer, twirling and leaping on stage! What's that you say? I have no arms... why are you focusing on my lack of arms? I'll just be an Irish dancer!

Or I can be a knight, rescuing a princess from a vicious dragon! Uh oh....that dragon is looking at me like I'm a snack. You know, I've heard that they think bookworms are delicious. I think I will go before he confirms it.

But what I like best is that no matter how many adventures I take, I know I can go on more just by diving into a new book. I love being a bookworm.
Awww, the library is closing. Time to take a nap before my next great adventure! (Meep, meep meep, meep -this is the sound of a bookworm snoring).

THE END
Thursday, May 9, 2013
CSA Cooking: Week 1 Swiss Chard and Cheddar Quiche
This year the Hubby and I decided we wanted to try signing up for a CSA (Community Supported Agriculture) where we pay them a lump sum at the beginning of the season and we get however many weeks of fresh produce. The produce varies week to week depending what is in season and what the farm is growing. Since it is just the two of us, we decided to split it with my parents- which worked out this year because we can admit we wouldn't have been able to afford signing up for it by ourselves.
Anyway this week is the first week of our CSA and we are SO EXCITED! We pick up our box of goodies on Tuesdays and on my way home from work I drop of my parent's half at their house. This week we got strawberries, green onions (gigantic ones), beets, sweet potatoes, asparagus, radishes, spring greens and swiss chard. We ate the spring greens the first day but we had never cooked, or even eaten, swiss chard so we had to figure out what to do with it. I decided on this Swiss Chard and Cheddar Quiche from Real Simple. However, we didn't have ALL the same ingredients they called for, and some additional ones, I altered it some.
This is what I started with :

1/2 cup egg white subtitute


So far we are enjoying the CSA, but it is also only week one. The only problem that I have encountered is that usually I do my grocery shopping on Friday and I have the next week's meals planned before I go shopping (we've cut our grocery bill down by a little more than 1/3 by doing this); however, with the CSA we don't know what we're getting until I get it on Tuesday. So I'm having to plan a few more options so that the meals are more flexible. I'm finding that a little frustrating, and it makes it harder to stick to the meal plans, but we're getting there!
Anyway this week is the first week of our CSA and we are SO EXCITED! We pick up our box of goodies on Tuesdays and on my way home from work I drop of my parent's half at their house. This week we got strawberries, green onions (gigantic ones), beets, sweet potatoes, asparagus, radishes, spring greens and swiss chard. We ate the spring greens the first day but we had never cooked, or even eaten, swiss chard so we had to figure out what to do with it. I decided on this Swiss Chard and Cheddar Quiche from Real Simple. However, we didn't have ALL the same ingredients they called for, and some additional ones, I altered it some.
This is what I started with :

Ingredients:
1 tablespoon olive oil
1 bunch swiss chard (we actually had half a bunch)
1 green onion chopped (ours was huge)
1/2 cup regular egg substitute1/2 cup egg white subtitute
3/4 cup evaporated milk
kosher salt and black pepper
1/2 cup cheddar cheese, shredded
1 prebaked 9.5 inch pie crust
If you have to make your pie crust, do that first. That is what I did- and I used dried out chickpeas to weigh down the bottom of the pie crust when I baked it so it didn't puff up. Then on to the quiche itself!
1) Preheat the oven to 350 degrees F.
2) Chop your swiss chard and green onion(s) into bite size pieces. Heat the tablespoon of oil in a large skillet over medium-high heat. Add the chard and onion and cook until tender.

3) In a bowl, beat the egg substitute, evaporated milk. Season with salt and pepper (I would suggest around 1 teaspoon salt- I used less and it was not enough). Add the cheddar and the chard mixture and mix it all up. Pour into the pre-baked pie crust and bake until set, 35-40 minutes.


After the quiche is done baking let cool for a few minutes before cutting into it. Then serve it up and enjoy!

Friday, May 3, 2013
Planning for flower bed #1
One of the things that Superman and I have quickly discovered is that with the house and making updates to it, it is all about baby steps. We know this, we still find it frustrating, but we know it. We are slowly starting to embrace the baby steps. The next baby step is working on boxing in our flower beds in the front. Unless we can find the landscaping timbers cheaper at a local lumber yard, we will be starting off by just doing one of the flower beds at the end of the month when we have friends coming over to help. However, the first step is figuring out how many we need! A couple weeks ago during Home Depot's "Spring Black Friday" sale we got some of the landscaping timbers (granted we didn't realize they were on sale until we checked the prices online recently- oops!) so that we could use the timbers to figure out how many we needed for the length and the height that we're going to make the bed.
So today I did a very quick, and I do mean very quick, dig around the edges of the flower bed so that I could lay down the timbers we have to try to get the idea. The result was this :

The whole point of this endeavor was to see how timbers we need to buy- we don't want to have to make multiple trips because we don't get enough. The end result will have all the top edges even with the top of the bottom step leading up to the door. We've figured we're going to need 18 more timbers, round it up to 20 for extras in case of cutting mistakes, etc. once that is done we'll lay down a barrier so that weeds can't grow up through the bed, add more dirt and then re-mulch. Right now the mulch is shredded leaves from our backyard. We still have plenty of leaves to shred- and some already shredded hanging out in the back. We also have a pile of brush to shred. So we'll have to buy the timbers, hardware for attaching it all together and the dirt- hopefully we'll have enough leaves and brush to shred for the mulch. Hopefully in June we'll be able to do the other side. I don't expect us to plant any flowers this year, but you never know, we may be able to squeeze that in as well.
Of course, watching me do the small amount of digging and laying out the timbers was exhausted work for our little hound dog, so now she is chilling out on the sofa with her Daddy, with only her nose sticking out.
 \
\
So today I did a very quick, and I do mean very quick, dig around the edges of the flower bed so that I could lay down the timbers we have to try to get the idea. The result was this :
 |
| As you can see, Snickers wanted in the picture too |

 |
| How you can tell we are clearly just trying to get an idea- there was no attempt to cut the timbers to size :-) |
Of course, watching me do the small amount of digging and laying out the timbers was exhausted work for our little hound dog, so now she is chilling out on the sofa with her Daddy, with only her nose sticking out.

Thursday, May 2, 2013
“Every oak tree started out as a couple of nuts who decided to stand their ground.”
All I can say about the above quote is no freaking kidding- in regards to the nuts deciding to stand their ground . I was soooo excited to get the backyard cleared. A month and a half ago our backyard looked like this :
I know things grow quickly in the spring, but this is ridiculous. We're going to mow all the sprouts down and keep on top of them to try to keep them from coming back. We're hoping when we get to the point of planting grass seeds the grass will help smother the little oak trees. But I've also decided that oak trees are the rabbits of the tree world.
Don't get me wrong, I love oak trees. They are very important to me religion wise. Oak trees symbolize the half of the year where the sun is growing strongest. They are also a symbol of protection and prosperity (depending on your beliefs and how to treat the trees). They are simply sacred to me. However, I would also like to be able to use our backyard as a yard, not just as an area to grow brush. Even the stumps that I had sawed down are sprouting again. *sigh* oh well. It's better than it was.
In other backyard news. We have a giant ant hill that we're slowly working on getting rid of. That is not so fun. However! I also found out we have at least one chipmunk! This made me ridiculously happy!
The day I saw him I went around singing the little bit I know of the "Chip and Dale Rescue Rangers" Theme song- much to the amusement- maybe even annoyance- of my co-workers. So that is how I will leave you!
 |
| Now I understand this was before everything starting blooming, but this was a couple months ago. |
NOW after everything has starting blooming our backyard looks like this:
 |
| To be fair, we knew the area towards the middle of the picture would look like this. But the rest, that all sprouted up in the last 2 months. |
 |
| It's harder to see in this picture- but there are little green oak leaves coming up every couple feet. This is the area that I spent hours pulling up all the little saplings. |
Don't get me wrong, I love oak trees. They are very important to me religion wise. Oak trees symbolize the half of the year where the sun is growing strongest. They are also a symbol of protection and prosperity (depending on your beliefs and how to treat the trees). They are simply sacred to me. However, I would also like to be able to use our backyard as a yard, not just as an area to grow brush. Even the stumps that I had sawed down are sprouting again. *sigh* oh well. It's better than it was.
In other backyard news. We have a giant ant hill that we're slowly working on getting rid of. That is not so fun. However! I also found out we have at least one chipmunk! This made me ridiculously happy!
 |
| This is our chipmunk friend, I've named him Dale. |
 |
| Here is Dale again. |
Wednesday, April 17, 2013
First adventure into meal planning, and couponing
I mentioned in one of my previous posts that we're working on spending less & saving more. For us, this means some serious budgeting, especially for groceries. I'm not going to say how much we were spending, but let's just say it was ridiculous since there are only two of us. So we've decided we're going to get better, I started reading books about budgeting and cutting grocery bills in half. Originally we decided to start by just trying to reduce our grocery spending by $100 this month. However, after today I think we can do better. I used today to buy some of the essentials we needed like carrots, celery, hummus, cereal, etc. Stuff that we eat a LOT of that doesn't keep. However, I also used today to work on building up a stockpile of things we use a lot; especially because those items were on sale- which is why I bought them today!
I do want to make it clear, I'm not a super awesome coupon person. I am not at that point where I can get a $100 worth of stuff and only pay $4. Honestly, I don't think I'll EVER get to that point. However, I did save almost $30 today and I met the goal of staying under $100. That got me thinking, "Hey, that wasn't hard...." so I'm thinking we'll be able to aim for $100 a week instead and that will cut our grocery bill down even more (I told you, our bill was ridiculous).
So here are the things I've learned so far:
1) Plan your meals! It seems like a complete pain, but it is completely worth it. I've only done this for a few days but I can't say it has! I'm less frazzled when I get home because I have a plan for dinner, I don't have to stand at the fridge or pantry wondering what the heck I'm going to make.
2) Plan your meals around the sales flyers:
This is less of a big deal for me this time- because I only needed a few things for this week's dinners. However, I did use this to plan out what cereals I bought and what items I bought to work on stocking up our "use a lot" section.
3) Don't clip coupons for things you don't buy, pay attention to the coupons and they stack on already there sales!
This is one I'm still working on. I'm pretty good about not clipping coupons for stuff we don't normally buy. I misread a couple coupons today- but it worked out ok. I didn't realize I could stack coupons on top of the store sales, but you can! That saved me a few bucks today too!
Right now I'm at the "start small" stage. I realize it will take me a while to figure out how to save even more money. But I"ll get there.
Sunday, April 14, 2013
Ice Cream!!!!!
One of the things Superman and I love is ice cream, unfortunately for our attempts to eat healthy it is also hard to stop at one serving if we are scooping it at that moment. HOWEVER, we have a solution! It isn't those oh-so-yummy single serve cups that can be bought for between $1-$4 at the grocery store. Since we are trying to reduce our grocery spending we were trying to figure out the best way to continue to have ice cream without having to worry about remembering the serving size when our brains are screaming "ICE CREAM" at us. So my solution.....


Yup, it's really that simple. We got more of the GLAD 1/2 cup tuperware and got ready to make our own single serving of ice cream cups! It really wasn't that time consuming, it took maybe half an hour. Though, I don't suggest doing this if you are having a major craving for ice cream, you'll find that a bite for each container gets eaten. So we started with basically 2 sets of 8 of the GLAD 1/2 cup containers and a 1.5 qt carton of ice cream. On a side note, this ice cream, Turkey Hill's limited edition Chunky Peanut Butter, is delicious! We ended up with about 9 individual containers of ice cream. If you go with the lowest of the single serve ice cream containers that $9 worth of ice cream. However, since we scooped it out ourselves and our 1.5 qt of ice cream was $2.99 that is 33 cents per single serve cup. I'd that that is a considerable amount of savings.Granted, you have to buy the containers, and we picked these up for $3.49 but since they can be reused over and over and over again I would say it is completely worth it. This is also one of the few times I'd actually say go with the name brand containers. The store brand containers of similar size tend to crack when you take the lid off trying to get to your ice cream, I've yet to have a GLAD lid crack on me.
I'm loving this idea. Next time we're going to buy a big container of plain vanilla ice cream and then add our own "fillers"- like pineapple, or strawberries and peanut butter, etc. We're not sure if that will make a huge price difference or not- but it sounds fun! But anyway, like I said, super easy and cheap!
 |
| Our ice cream cups all lined up, waiting to be devoured (some already were). |
Subscribe to:
Posts (Atom)